Rook+Ceph 노트
Rook+Ceph 노트
지난 가천 카카오엔터프라이즈 SW 아카데미 기간동안 프로젝트를 진행하면서 노션에 작성한 Rook 노트 내용을 옮긴 것이다.
클라우드 네이티브 기반의 서비스를 구축하는 만큼 스토리지까지 쿠버네티스 스토리지 클러스터 구축하기 위해 사용하였다.
Team Github: https://github.com/KEA-ACCELER
A-Log(동시편집 기반 릴리즈 노트 공유 시스템) : https://github.com/KEA-ACCELER/alog-cluster
A-Form(GPT 기반 설문 플랫폼) : https://github.com/KEA-ACCELER/aform-cluster
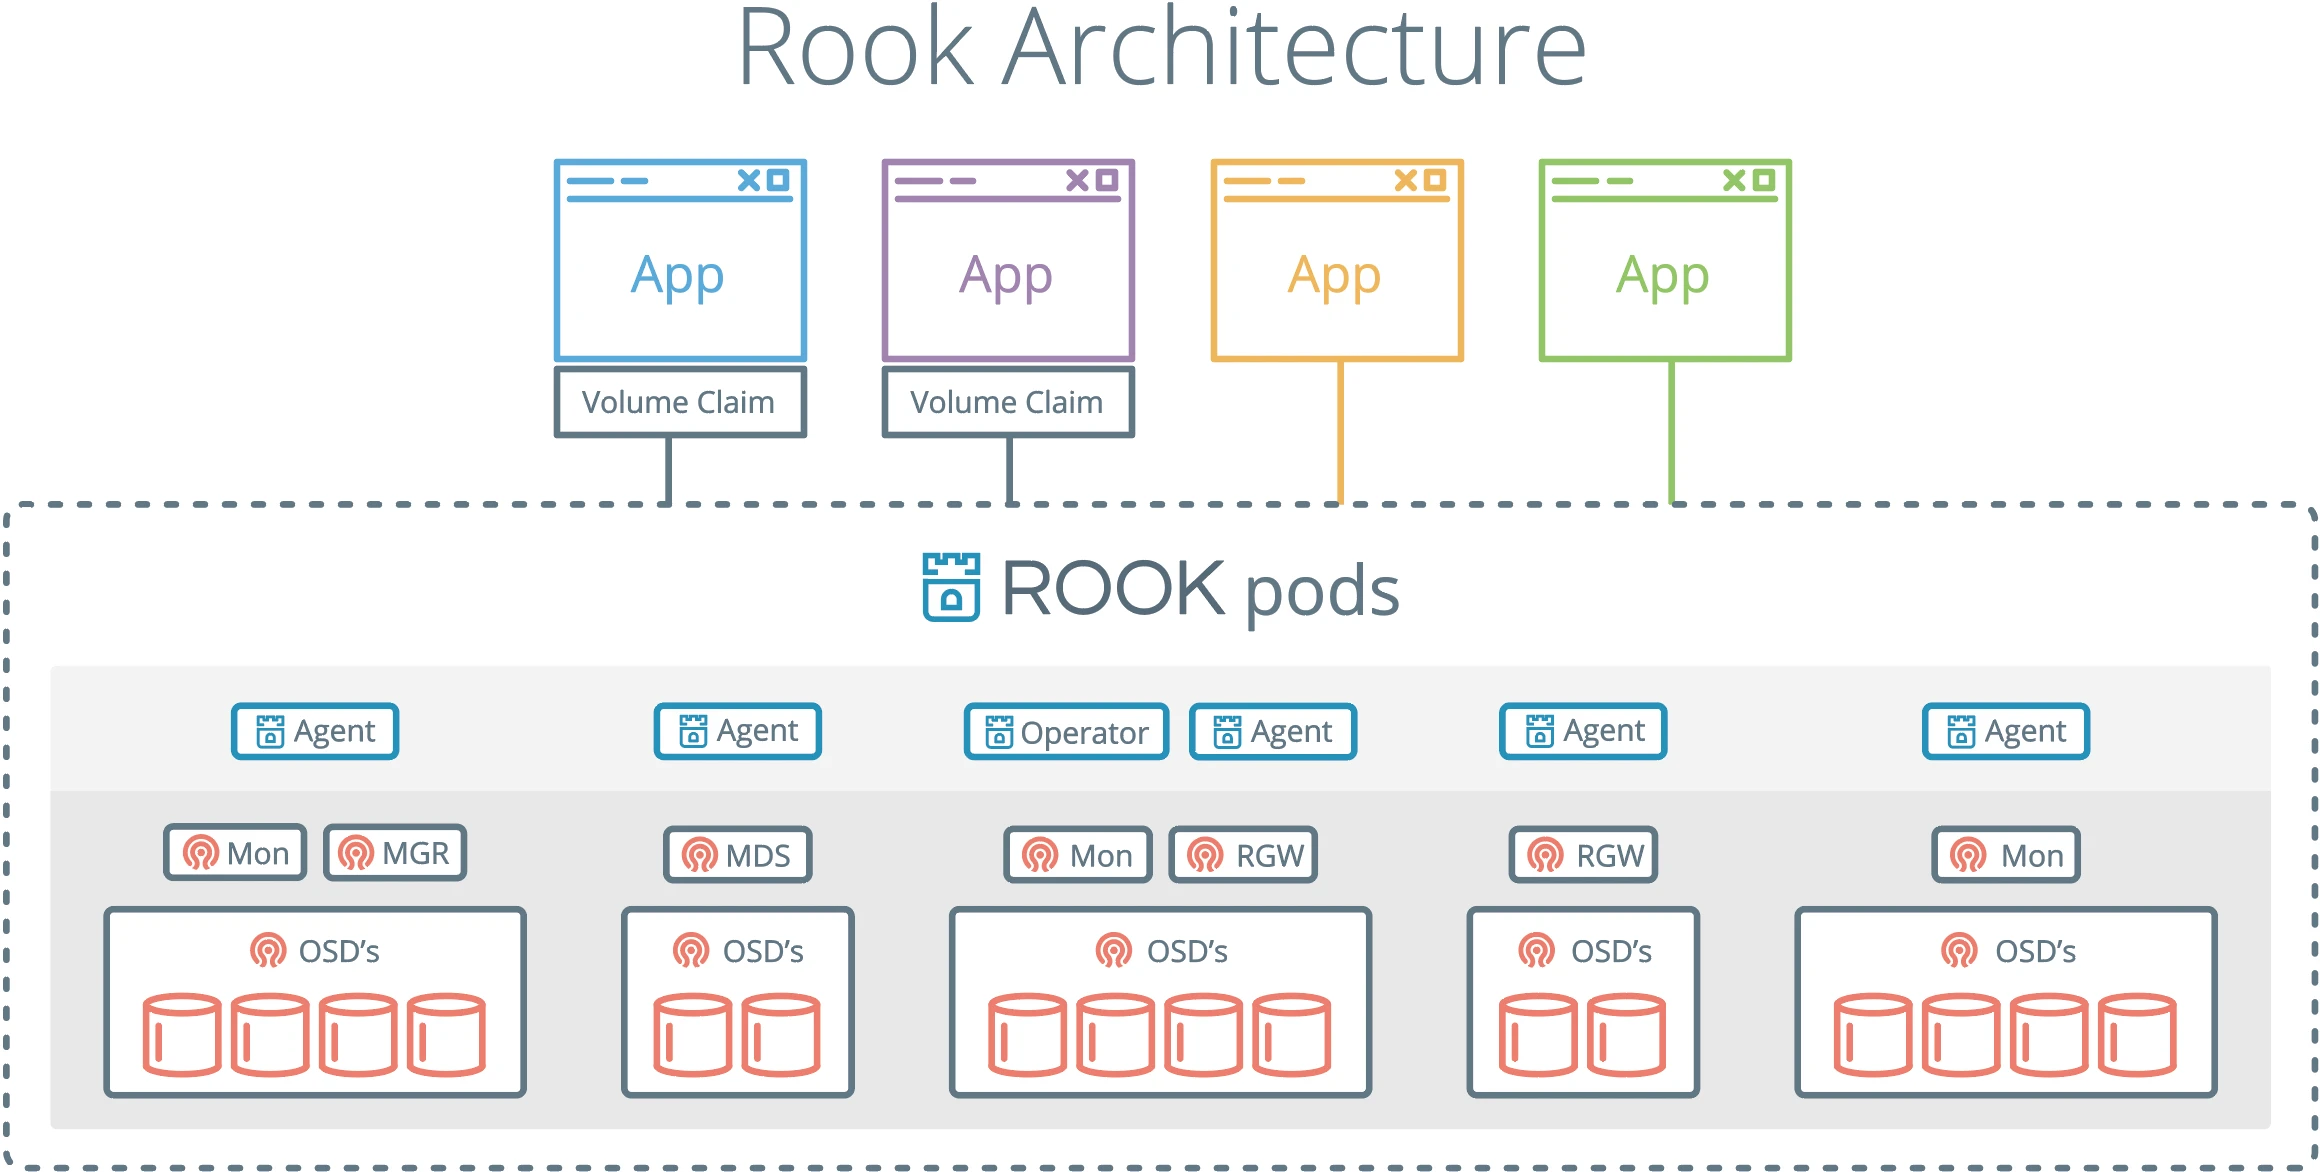
Rook + Ceph 스토리지 클러스터
Storage Architecture - Rook Ceph Documentation
rook과 ceph은 쿠버네티스 스토리지 클러스터를 구축할 때 사용할 수 있는 오픈소스 솔루션이다.
rook은 클라우드 네이티브 스토리지 오케스트레이터로, 쿠버네티스와 통합되는 다양한 스토리지 솔루션을 제공하고 관리하는 플랫폼이다.
ceph은 분산 파일 시스템으로, 높은 확장성과 내구성을 가진 스토리지 클러스터를 구성할 수 있다.
rook을 사용하면 ceph 클러스터를 쿠버네티스에서 쉽게 배포하고 운영할 수 있다. rook은 ceph의 다양한 스토리지 유형을 지원한다. 예를 들어, 블록 스토리지는 단일 파드에 스토리지를 제공하고, 오브젝트 스토리지는 S3 API를 통해 데이터에 접근할 수 있고, 공유 스토리지는 여러 파드에서 파일 시스템 기반의 스토리지를 공유할 수 있다.
DB를 구축할 Block Storage 그리고 이미지 파일 등을 저장하기 위한 Object Storage가 필요해 Rook + Ceph을 사용한 스토리지 클러스터를 구축하였다.
Rook + Ceph 구축
Prerequisites
Prerequisites - Rook Ceph Documentation
Rook + Ceph을 사용하기 위해서는 우선 당연하게도 스토리지가 필요하다. 스토리지는 아래 요건중 하나를 만족해야 한다.
- Raw devices (no partitions or formatted filesystems)
- Raw partitions (no formatted filesystem)
- LVM Logical Volumes (no formatted filesystem)
- Persistent Volumes available from a storage class in
blockmode
Installation
Quickstart - Rook Ceph Documentation
Helm을 사용해 설치할 수도 있다.
Operator 설치
Ceph Operator Helm Chart - Rook Ceph Documentation
Ceph Cluster 설치
Ceph Cluster Helm Chart - Rook Ceph Documentation
rook-ceph-cluster 1.11.7 · rook/rook
Helm을 사용해 values를 설정하고 설정을 적용해 설치해 주었다.
설치 확인
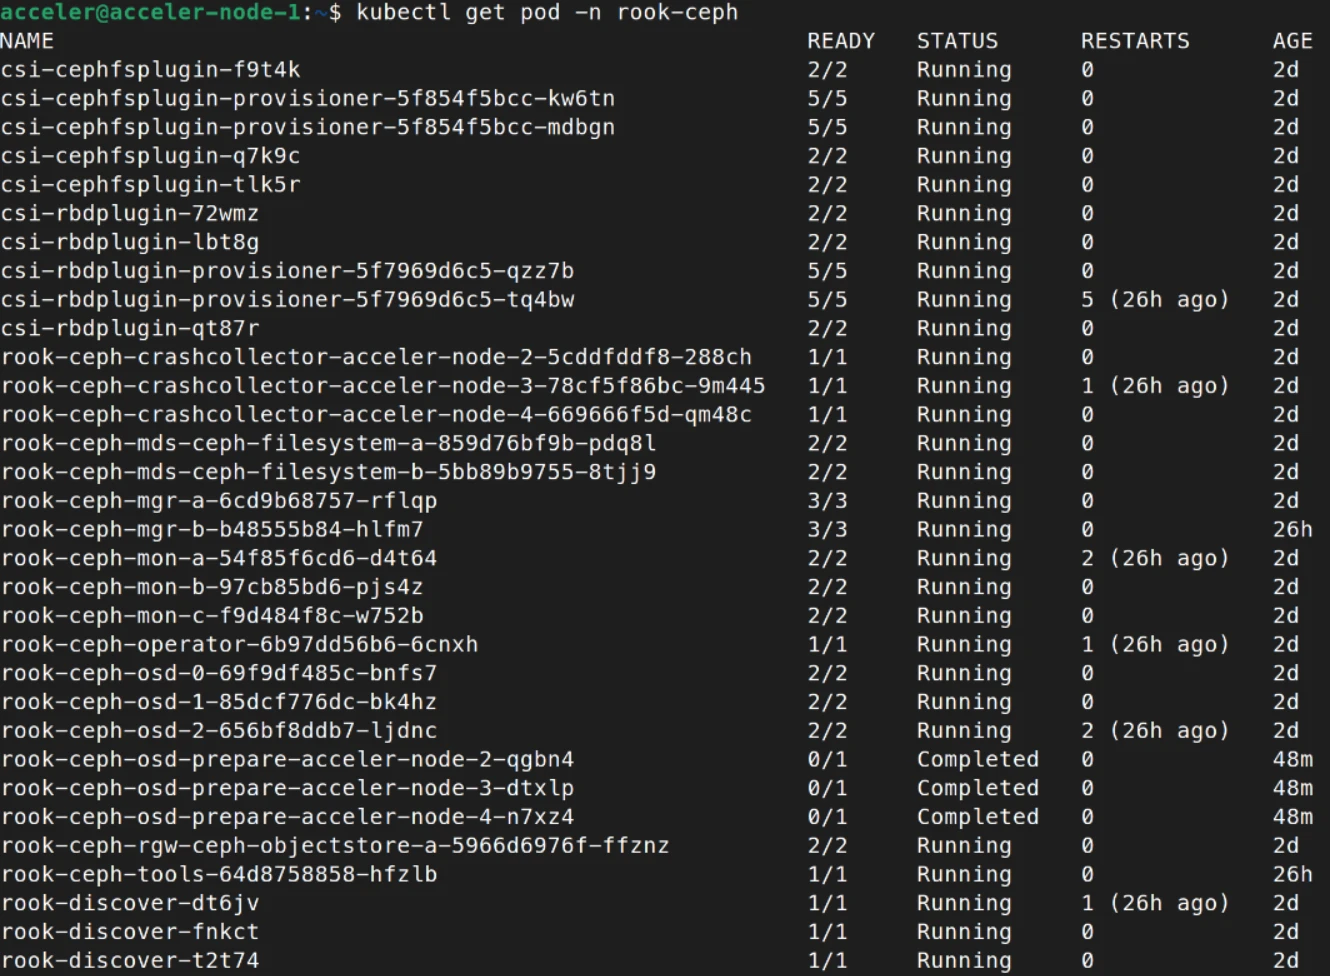
설치가 완료되면 정상적으로 배포되었는지 아래 명령을 통해 확인할 수 있다.
1
kubectl -n rook-ceph get pod
Ceph을 통해 사용할 수 있는 File System, Block Storage, Object Storage의 사용법은 각각의 문서에서 확인할 수 있다.
Filesystem Storage Overview - Rook Ceph Documentation
Block Storage Overview - Rook Ceph Documentation
Object Storage Overview - Rook Ceph Documentation
S3 API를 사용한 파일 업로드, 다운로드 테스트
S3 API를 사용한 Object Storage 사용법은 추가로 알아볼 필요가 있어 검색을 하였고 nodejs를 사용해 테스트 코드를 작성하였다.
Connect Node.js to MinIO with TLS using AWS S3 — Northflank
테스트는 위 링크를 참고하였다. MinIO를 S3 API를 사용해 테스트하는 예제이지만 Ceph도 S3 API를 사용하기 때문에 동일하다.
node.js를 사용해 테스트 했으며, @aws-sdk/client-s3 라이브러리를 사용하였다. (이게 v3 라이브러리로 가장 최신이다)
S3 API를 사용하기 위해서는 키값등의 정보를 확인해야 하는데 아래 링크에서 확인할 수 있다.
Object Storage Overview - Rook Ceph Documentation
1
2
3
4
5
6
#config-map, secret, OBC will part of default if no specific name space mentioned
export AWS_HOST=$(kubectl -n default get cm ceph-bucket -o jsonpath='{.data.BUCKET_HOST}')
export PORT=$(kubectl -n default get cm ceph-bucket -o jsonpath='{.data.BUCKET_PORT}')
export BUCKET_NAME=$(kubectl -n default get cm ceph-bucket -o jsonpath='{.data.BUCKET_NAME}')
export AWS_ACCESS_KEY_ID=$(kubectl -n default get secret ceph-bucket -o jsonpath='{.data.AWS_ACCESS_KEY_ID}' | base64 --decode)
export AWS_SECRET_ACCESS_KEY=$(kubectl -n default get secret ceph-bucket -o jsonpath='{.data.AWS_SECRET_ACCESS_KEY}' | base64 --decode)
현재 Ceph Object Storage 접속을 위한 환경변수들
1
2
3
4
5
AWS_ENDPOINT=https://alog.acceler.kr/
REGION=us-east-1
S3_BUCKET_NAME=
AWS_ACCESS_KEY_ID=
AWS_SECRET_ACCESS_KEY=
업로드
1
2
3
4
5
6
7
8
9
10
11
12
13
14
15
16
17
18
19
20
21
22
23
24
25
26
27
28
29
30
31
32
33
34
35
36
37
38
39
const { S3Client, PutObjectCommand } = require("@aws-sdk/client-s3");
const fs = require('fs');

const endpoint = 'https://alog.acceler.kr/';
const region = 'us-east-1';
const access_key = 'key';
const secret_key = 'key';

const s3 = new S3Client({
  region: region,
  credentials: {
    accessKeyId: access_key,
    secretAccessKey: secret_key,
  },
  endpoint: endpoint,
  forcePathStyle: true,
});

const bucket_name = 'ceph-bkt-1b955639';
const local_file_path = './test.txt';

(async () => {
    try {
        // uploading object with string data on Body
        const objectKey = "test.txt";
        await s3.send(
            new PutObjectCommand({
                Bucket: bucket_name,
                Key: objectKey,
                Body: fs.createReadStream(local_file_path),
								ACL: "public-read", // 아무나 접근 가능하게 하고 싶으면 추가
            })
        );

        console.log(`Successfully uploaded ${bucketName}/${objectKey}`);
    } catch (err) {
        console.log("Error", err);
    }
})();
다운로드
1
2
3
4
5
6
7
8
9
10
11
12
13
14
15
16
17
18
19
20
21
22
23
24
25
26
27
28
29
30
31
32
33
34
35
36
const { S3Client, GetObjectCommand } = require("@aws-sdk/client-s3");
const fs = require('fs');

const endpoint = 'https://alog.acceler.kr/';
const region = 'us-east-1';
const access_key = 'key';
const secret_key = 'key';

const s3 = new S3Client({
  region: region,
  credentials: {
    accessKeyId: access_key,
    secretAccessKey: secret_key,
  },
  endpoint: endpoint,
  forcePathStyle: true,
});

const object_key = "test.txt";
const bucket_name = 'ceph-bkt-1b955639';
const local_file_path = './downloaded.txt';

(async () => {
    try {
        const readObjectResult = await s3.send(
            new GetObjectCommand({ Bucket: bucket_name, Key: object_key })
        );

        const writeStream = fs.createWriteStream(
            local_file_path
        );
        readObjectResult.Body.on("data", (chunk) => writeStream.write(chunk));
    } catch (err) {
        console.log("Error: ", err);
    }
})();
주의 할점은 aws-sdk 가 아닌 @aws-sdk/client-s3 라이브러리를 사용했다는 것이다. 또한 forcePathStyle: true, 옵션을 추가해주어야 문제없이 동작한다.
Common Entities — Ceph Documentation
이는 Ceph 공식 문서에서 권장하는 bucket as the top-level directory in the URI 방식이다.
Persistent Volume을 사용한 Block Storage 사용
쿠버네티스에서는 Persistent Volume과 Persistent Volume Claim 이라는 사용자 및 관리자에게 스토리지 사용 방법에서부터 스토리지가 제공되는 방법에 대한 세부 사항을 추상화하는 API를 제공한다.
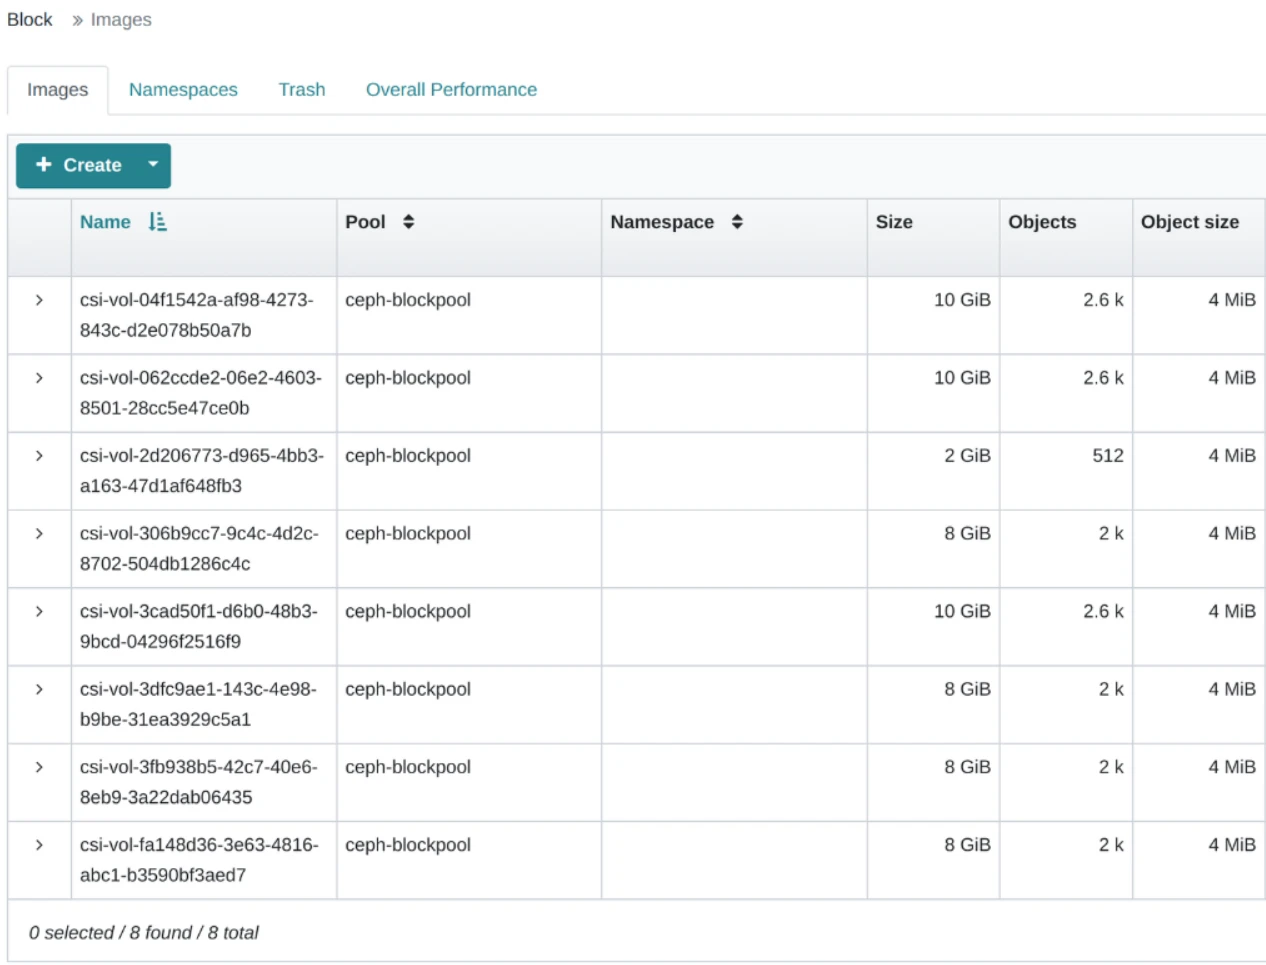
이번 프로젝트에서는 아래와 같이 PVC를 설정하여 DB에 블록 스토리지를 연결해주었다.
1
2
3
4
5
6
7
8
9
10
11
apiVersion: v1
kind: PersistentVolumeClaim
metadata:
  name: issue-db-pvc
spec:
  storageClassName: csi-cinder-sc-delete
  accessModes:
    - ReadWriteOnce
  resources:
    requests:
      storage: 10Gi
아래는 볼륨들이 생성된 모습이다.
Ceph Dashboards
마지막으로 dashboards를 사용해 gui를 통해 ceph 운영 상황을 확인할 수 있다.
Ceph Dashboard - Rook Ceph Documentation
다만 object 스토리지 탭이 제대로 뜨지 않는 문제가 있는데 검색 결과 아래 이슈를 확인할 수 있었다.
비밀번호는 아래 명령으로 확인할 수 있다.
1
kubectl -n rook-ceph get secret rook-ceph-dashboard-password -o jsonpath="{['data']['password']}" | base64 --decode && echo
https://github.com/rook/rook/issues/12099
현재 버전에서는 이슈가 있는것으로 보인다.


